How to Find Hole in Air Mattress?

An air mattress is a convenient and comfortable bedding solution, especially for guests or camping trips. However, waking up on a deflated one can be quite a surprise. The challenge? Finding that tiny hole causing the issue. But don’t fret; with the right techniques, you can locate and fix it in no time. How to Find Hole in Air Mattress?
Initial Inspection
When you first suspect that your air mattress has a leak, the initial inspection is crucial. Begin by fully inflating the mattress. Ensure it’s at its maximum capacity, as this will make any holes or punctures more noticeable. Lay the mattress on a flat, smooth surface, preferably in a well-lit area. This will help you spot any immediate issues. Look for any signs of damage, such as small cuts, tears, or areas where the material appears worn out. Sometimes, the hole might be minuscule and not immediately visible. In such cases, you might notice the mattress deflating over a few hours, which is a clear sign that there’s a leak somewhere.
Visual and Tactile Methods
After the initial inspection, if you haven’t located the hole, it’s time to get a bit more hands-on. The visual method is all about keen observation. Scan the mattress inch by inch, looking for any discrepancies in the material. Using a flashlight can help, especially in highlighting tiny punctures that might be missed in regular lighting. For the tactile method, use your hands. Run your palms and fingers over the surface of the mattress. Feel for any air escaping or a change in temperature on your skin, which can indicate a leak. This method is especially effective in a quiet environment where you can also listen for any hissing sounds of escaping air.
Listening for the Leak
The human ear can be surprisingly adept at picking up the faintest of sounds, especially when you know what you’re listening for. In a quiet room, with minimal background noise, press down on the mattress and listen intently. The sound of air escaping, a soft hiss, can guide you to the leak’s location. Move your ear closer to the mattress surface, especially in areas where you suspect the leak might be. The sound will become more pronounced as you near the puncture. If you’re struggling to hear the leak, you can also try the nighttime when ambient noises are at a minimum, making it easier to detect the escaping air.
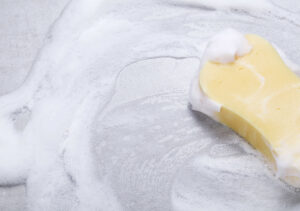
The Soapy Water Method
The soapy water method is a tried and true technique that has been used for years to detect leaks in various items, including air mattresses. The principle behind this method is simple: air escaping from a hole or puncture will produce bubbles when it comes into contact with a soapy solution. This method is not only effective but also safe for your mattress, as long as you ensure to clean it afterward. It’s a preferred method for many because it provides a visual confirmation of the leak, making it easier to address the issue.
Preparing the Solution
To prepare the soapy water solution, you’ll need a few basic items that are commonly found in most households. Take a bowl or container and fill it with water. Add a few drops of dish soap and stir the mixture until it’s well combined. The goal is to create a solution that’s bubbly but not overly so. You don’t want it to be too thick or frothy, as this can make it harder to spot the escaping air bubbles. Once your solution is ready, you can either pour it into a spray bottle for easier application or use a cloth to dab it onto the mattress.
Applying and Identifying Bubbles
With your soapy solution prepared, start by inflating the air mattress to its full capacity. This will increase the pressure inside, making it easier to spot leaks. Spray or dab the solution onto the mattress, focusing on areas where you suspect there might be a leak. As the air escapes from any holes or punctures, it will interact with the soapy water, creating bubbles. These bubbles are a clear indication of where the leak is located. Ensure you cover the entire surface of the mattress, including the seams, as leaks can often occur in these areas. Once you’ve identified the leak, mark the spot with a marker or piece of tape so you can address it later. Remember to rinse off the soapy solution thoroughly after you’re done to prevent any residue or potential damage to the mattress material.
The Tissue Paper Test
The tissue paper test is another innovative method to detect leaks in an air mattress. Unlike the soapy water method, which relies on visual cues, the tissue paper test uses the sensitivity of the tissue to detect even the slightest air movement. This method can be particularly useful when dealing with tiny punctures that might not produce noticeable bubbles with the soapy water technique.
How it Works

To conduct the tissue paper test, you’ll need a piece of tissue paper or a thin napkin. Inflate your air mattress and lay the tissue paper flat on its surface. Slowly move the tissue paper across the mattress, especially focusing on areas you suspect might have a leak. If there’s a puncture, the escaping air will cause the tissue paper to flutter or move. The more pronounced the movement, the larger the leak. It’s a simple yet effective way to pinpoint the exact location of a leak without the mess of soapy water.
Benefits of this Method
One of the primary benefits of the tissue paper test is its simplicity. There’s no need for any solutions or mixtures, and there’s no cleanup afterward. Additionally, this method can detect even the smallest of leaks, making it highly effective for thorough inspections. It’s also a dry method, which means there’s no risk of leaving behind any residue or moisture on the mattress.
Safety Precautions
While the tissue paper test is relatively straightforward, there are still some safety precautions to keep in mind. Ensure that the area around the mattress is free from sharp objects that could cause additional punctures. Also, if you’re conducting the test indoors, make sure the room is well-ventilated, especially if you’ve recently used any cleaning agents or solutions on the mattress.
Ensuring the Mattress is Dry
Before conducting any tests, especially after using the soapy water method, it’s crucial to ensure the mattress is completely dry. Any residual moisture can compromise the integrity of the mattress material over time. To dry the mattress, you can either leave it inflated in a well-ventilated area or use a hairdryer on a cool setting. Ensure every part, especially seams and folds, is dry to the touch.
Avoiding Over-inflation
Over-inflating the air mattress can not only distort its shape but also put undue pressure on existing punctures, making them larger. Always follow the manufacturer’s guidelines when inflating the mattress. If you’re unsure, it’s better to under-inflate slightly and add more air as needed. Over-inflation can lead to a less comfortable sleeping experience and reduce the lifespan of your mattress.
How to Patch a Hole in an Air Mattress
Discovering a hole in your air mattress can be frustrating, especially when you’re looking forward to a comfortable night’s sleep. However, with the right tools and techniques, patching up that pesky puncture can be a breeze. It’s essential to address the hole promptly to prevent it from expanding and causing further damage to the mattress.
Choosing the Right Patch Kit
When it comes to patching an air mattress, not all kits are created equal. It’s crucial to select a patch kit specifically designed for air mattresses, as these kits come with adhesive that can bond securely with the mattress material. Many air mattresses come with their own patch kits, but if yours didn’t, or you’ve misplaced it, you can easily find one at camping stores or online. Ensure the patch is slightly larger than the hole for optimal coverage.
Step-by-step Patching Guide
- Deflate the Mattress: Before you begin, ensure the mattress is fully deflated. This makes it easier to apply the patch evenly.
- Clean the Area: Using soapy water or rubbing alcohol, clean the area around the hole. This ensures the adhesive sticks properly.
- Cut the Patch: If your patch isn’t pre-cut, trim it so it’s slightly larger than the hole.
- Apply Adhesive: Depending on your kit, you might need to apply adhesive to the patch or the mattress. Follow the kit’s instructions closely.
- Place the Patch: Firmly press the patch over the hole, ensuring there are no air bubbles. Allow it to set for the time recommended in the kit’s instructions.
Alternative Patching Methods
While patch kits are the most common solution, there are other methods you can employ if you’re in a pinch. These alternatives can be handy when you’re camping or don’t have immediate access to a patch kit.
- DIY Solutions: In the absence of a patch kit, items like duct tape or even a piece of plastic can serve as temporary solutions. While these aren’t long-term fixes, they can help in a bind. Just ensure the area is clean and dry before applying.
- When to Opt for Professional Repair: If your air mattress has multiple punctures or a particularly large tear, it might be time to seek professional help. Some specialty stores offer repair services. While this can be more costly than a DIY fix, it ensures the repair is durable and extends the life of your mattress.
How to Prevent Future Leaks
Prevention is always better than cure. By taking a few precautionary measures, you can significantly reduce the risk of future punctures and ensure your air mattress lasts longer.
- Proper Storage and Care: Always store your air mattress in a cool, dry place. If it comes with a storage bag, use it. This protects the mattress from sharp objects and environmental factors that could degrade its material.
- Avoiding Puncture Risks: Be mindful of where you’re setting up your air mattress. Avoid areas with sharp objects or rough surfaces. If you’re camping, clear the ground of twigs and stones before laying down your mattress. Additionally, be cautious with items like jewelry or watches that could accidentally puncture the mattress when you’re on it.


Comments are closed.